By popular request, I am reposting my old Link (Legend of Zelda) costume tutorial/guide. This is pretty much unchanged since it's old posting, so there may be outdated info.

Link is a costume that you can put together really
quickly
or add a lot of detail to - there are many ways to do this
costume depending
on your skill level, and you'll still look like Link when
you're done.
Link is instantly recognizable and still popular 20 years
after his video
game debut. Legend of Zelda: Twilight Princess has been highly
anticipated since its first E3 trailer - the guy is a beloved hero for
the ages. This is a costume that I've seen an equal number of guys and
gals attempt - you don't have to be male to dress as Link. In fact, the
Japanese commercial
for Link to the Past featured a female dressed as Link for the dance
sequence. This is one of those characters who can be played by either
gender without people giving you evil looks (as opposed to a guy
dressing as Zelda).
I originally didn't think this was a "great cosplay" since the costume
itself is very basic, but once I started working on the accessories and
props, I started to like it more and more. This isn't the most complex
version of Link I've seen, but it's not the simplest either. I'm writing
this journal so you'll be able to use some of my techniques if you ever
plan to make a Link costume of your own. Some ideas for materials came
from the good folks in the Zelda Cosplayers thread on Cosplay.com.
Green Tunic
I got about a yard and a half of cheap fabric to make a sample
with. I folded the fabric in half and laid an oversized T-shirt across
the fabric so only half of it was on the fold. I used a permanent marker
to trace where the neck, shoulders, and bottom of the shirt were on the
fabric. The sleeves will be a separate piece, so I didn't trace those.
After tracing and cutting out the front and back of the
shirt (the front has a "V" shape cut into the front), I sewed
the sides and shoulders together. I made a few adjustments to the T-shirt
- I made it longer, and flared the sides out slightly below the waist.
At this point, the garment looks like a long, shapeless vest. Adding the
belt helps give the tunic most of its shape.
If you want to make a really fancy Link tunic, you
can make the basic tunic two separate pieces - the shirt part for the
top, and a gathered "skirt" for the base. The skirt part should be a
very wide strip of fabric (at least twice the width of your waist),
which you'll gather and sew to the top. This will give you a more
flared-out base, but you'd run the risk of making it look too much like a
dress. The simplest way to make this is to do a one piece tunic.
The collar was a little more difficult to make than the
basic tunic. Using the "V" cutout in the front of the shirt,
I drew the collar shape on another piece of scrap fabric and cut it out
(1). Then I cut out another one, mirror flipped (2). Finally, I put these
next to the "V" shape and cut another piece of fabric for the
back of the collar that was the remaining space between the two collar
front pieces (3). I sewed these three pieces together to make one big
collar piece, then I sewed that to the "V" of the main shirt.
For the sleeves, I traced a regular shirt sleeve (seam-ripped
from the original shirt I modified to make Leia's shirt) and traced the
top of the sleeve. Then I made the sides wider and cut it out. I sewed
it closed first (so it formed a short tube), then sewed this to the tunic.
I added a belt I got for $1 at a thrift shop, and the tunic looked pretty
good.
 |
| Mockup with one sleeve complete |
I purchased "real" fabric at Jo-Anns - just plain
green cotton fabric that was about $2.99 per yard. Add a 40% coupon to
that, and I paid less than $6 for three yards of fabric, which I'm sure
will be more than enough.
The cotton fabric is easy to cut and sew. The edges will
need to be finished since this fabric seems to fray a little at the edges.
 |
| Tunic without sleeves |
Later, I decided to make a red Goron Tunic to increase
my costume wardrobe. I didn't make this tunic all one piece, however -
the top part and the "skirt" are separate. The "skirt" section is really
just a long strip of fabric, gathered slightly, and sewn to the
"shirt". the collar and sleeves were made the same way as the green
tunic. For a little extra detail, I added some brown bias tape to the
edges of the sleeves and the base of the tunic. I considered adding some
to the collar, but it looked too bulky.
Finally, I went back and added a set of belt loops
to both tunics. That was the last detail I needed. I made four belt
loops per tunic (I couldn't find an official number for Link's outfit -
all the reference pictures had a different number). For the Goron Tunic,
the belt loops insure that the belt doesn't slip away from the seam
line. The belt loops also help the tunics look less like short dresses.
White shirt & leggings
I purchased a white turtleneck at the Goodwill and cut a V shape
at the
front in the neck. I turned the shirt and collar inside-out and
sewed
along the cut edges. When I flipped it back, I had a nice
finished edge.
Using an X-acto knife, I punched several small holes through the
collar
on both sides. I strung a new white shoelace through the holes
in a diagonal
pattern to replicate Link's shirt. The ends of the shoelace were
tucked inside the collar and knotted (so they wouldn't come loose), and
the long ends were cut off.
The leggings also came from Goodwill. They were just regular women's stretch pants.
The turtleneck and leggings looked fine for the
part, the cotton material they were made from got hot quickly. I found
myself sweating a lot after a photoshoot, and the cotton fabric
(especially under the boots and gauntlets) would become soaking wet. I
later ordered a white spandex top and leggings from Dance4less.com.
First, I used a tape measure to determine
the size of my head where the
cap should go. I cut two long triangles out of green fabric -
the bottom
of each triangle was half of the measurement I took. I sewed the
sides
together and the cap was done. If you will be wearing a wig with
your Link costume, make sure that you measure your head size with the
wig on - otherwise, the cap will not fit.
I used two hair clips to hold the cap on my head when I
wore this costume. I fastened the clips right behind my ears.
Rather than try to find actual boots somewhere, I decided to make my own.
I started off by purchasing a pair of cheap canvas shoes from Kmart, which
will be used as the base. Then, I used some of the darker brown faux leather
(from Ganondorf's costume) and cut out basic boot shapes a bit larger
than I needed (after measuring around my legs first). Then I sewed the
sides together. This procedure is almost exactly what I did for Raichu's
feet, except that the Raichu costume had two pieces for boots - the shoe
and the legwarmer. This boot is all one piece.
I took the canvas shoes and glued a rounded piece of foam
to the top of the shoe that covers the toes. This will give the finished
product a more boot-like shape and add some lightweight bulk to the shoes.
Since I made the leather casing larger than necessary, there are no problems
fitting the leather around the modified shoes.
Next, I hot-glued the boot fabric to the shoes. I then took
a rectangular piece of fabric and glued this, wrong side up, to the tops
of the boots. Then I folded these over (so the wrong side was up) to make
the flaps over the top of the boots. The finished boots aren't spectacular,
but they're certainly cheaper than real boots. They're also easy to walk
in.
I wanted to add the buckles to the fronts of the boots, so I found two
small gold decorative buckles at Hobby Lobby. I cut two thin strips of
a lighter brown fabric and made two simple "belts" for the boot
tops. I secured these to the boots by sewing "belt loops" with
thread at the sides and back of the boots. I think it adds a nice amount
of detail to an otherwise plain accessory.
Gauntlets (Gloves)
The original gloves for this costume were
made several hours before Comic-con, so they didn't turn out very well. I
had made them out of the same fabric used for the boots - a thick,
fabric-backed vinyl. This was hot and not easily sewn. The gloves were
fairly shapeless and the seams began to come apart at the snipped
fingers. I decided to redo them for the Wii launch event.
I used a pair of Army work gloves for the
pattern, carefully removing the stitching and laying the pieces flat.
Any pair of old gloves will work, although you will have to make the
tops longer (so they reach halfway up your arms). I reconstructed the
glove with the new, brown pieces. It took a little work to get the
gloves to fit as the originals were too large for me. It's best to use a
well-fitting glove as your template.
The original gloves were made of a thick vinyl
fabric that didn't breathe or move well. The "fingers" split open at the
sides and folded in on themselves, and the arm shape kept bending back
along the seam. I redid the gloves out of a faux suede fabric - found
at Jo-Ann Fabrics as part of their Halloween fabric collection. The
fabric I purchased came in several shades of natural browns and had
"fringe" at the bottom - I'm supposing this was designed for a Native
American costume.
Sewing some parts of these gloves was very
difficult as the seams are very small. Some of the stitching needs to be
done by hand (around the pinky finger, for instance), and it took some
time to get these right. Once I sewed the pieces together, I then fit
the gloves more closely to my own hands. This was rather time-consuming,
as I had to keep resewing the seams a little further in each time until
they fit without being too snug. Once the gloves fit, I cut several
"belt loops" in the gloves around 3" and 5.5" from the arm edge. Then I
cut a few strips of the scabbard belt fabric and wove them through the
loops to replicate the bands on Link's gauntlets.
The original glove is on the left, and the
finished new glove on the right. Doesn't the new version look better?
It's also far more comfortable to wear.
Elf Ears
The original ears I used came from a costume shop.
They're a Woochie appliance called "Small Space Ear Tips", and attach
easily with Spirit Gum. However, these ears are a little small for
Link's ears, so I ordered a larger set.
Cosworx used to carry a set of plastic elf ears
that were worn like a headband. These have since been discontinued, but I
found a great site online for all your elven ear needs.
Aradanic Costumes
carries seven different styles of elven ear prosthetics, including sea
elf ears, hobbit ears, and Lodoss elf ears. It's a good selection for
whichever version of Link you're aiming for. I picked up the set of
Small Anime Ears and they look much better.
The Ocarina of Time Link wears a set of small,
blue hoop earrings. I originally used a set of very tiny hoops that I
had lying around in my jewelry box, but they had several problems. Aside
from being too small, they weren't true hoops (they were round in the
front, but the entire back was open), and they shifted to strange angles
sometimes. I acquired a second, better set of earrings from Wal-Mart's
jewelry section. I chose a set of silver closed hoops (about $2.97),
which I then painted with blue automotive spray paint. Now the earrings,
like the ears, are much more visible.
This was originally just going to be a second belt, but
I decided to make this more detailed.
I used a measuring tape to get an approximation of
the length
for the belt. Luckily, I just barely had enough of the light
brown leather-like
fabric to make this one piece. I sewed up the sides and had a
long, brown
tube. I used a buckle from a belt I found at a thrift shop - the
buckle
originally faced the other way, but I used wire cutters to make
some modifications.
I cut the center prong of the belt in half. This made the small
piece in the middle come off. I then used the remains of the prong as
the middle part because it faces the other direction. This is confusing
to explain, so please refer to the picture below:
The buckle on the front is purely decorative - the belt is big enough
to easily slide over my head and shoulder without needing to be fastened.
I tried to fill this tube with foam, but the backing of
the leather-like fabric wouldn't allow the foam to slide through. I sewed
several rows of stitching perpendicular to the length of the belt to make
the sections and left it at that.
The scabbard was more difficult. I had originally tried
to curve the foamcore (as with the shield, above), but it curved the wrong
direction. I traced the finished Master Sword on the foamcore and cut
the two scabbard pieces larger than the blade, but I couldn't make the
pieces join up - the curve was working against me. I wet the entire thing
down with water again and managed to flatten it out. From there, I worked
the correct curve into the foamcore manually using a wet washcloth and the
edge of the bathtub. This took some time and patience.
Once I finally achieved the curve I wanted, I used
hot glue
to join the sides of the scabbard. I painted the designs with
yellow paint,
and added FunFoam pieces to the top and bottom (which helped
cover up
the messy-looking bottom of the scabbard). I wound strips
of unbleached muslin around the top and bottom of the foamcore
tube and hot glued them in place. I then cut two thin strips of the
leather fabric and hot glued these to the belt to attach the scabbard.
The
scabbard is probably removable, but it holds in place well. I
will need to reglue the pieces that attach the scabbard to the belt - it
seems that these pieces are under the most stress.
Finally, I hot glued one of Ganondorf's spare gold
studs
to the front. Later, I added some more yellow designs to the
scabbard and filled in the basic designs I had created earlier.
Belt Pouch
This accessory isn't part of the Link character design (although
you can see something like this on the subscreens to represent the size
of your wallet and bomb bag), but it will be a necessity for carrying
around things like ID, keys, and Rupees (er, spending money). I basically
cut a large circle out of the faux leather fabric, cut some small slits
perpendicular to the edge (about an inch or so from the cut edge), and
threaded a piece of leather cord through the slits to make a simple drawstring
pouch. I knotted the ends of the cord together and slipped the belt through.
It worked great, although I might redo this out of the fabric I will remake
the gloves out of.
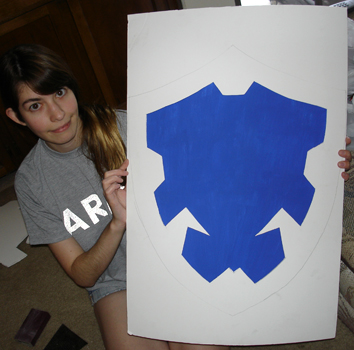
Following some advice I found on Cosplay.com, I purchased
two pieces of foamcore for the base of the shield. I tried leaving it
outside for a few days to get a curved surface, but it didn't work. However,
wetting one side of the foamcore with water gave the surface a nice rounded
curve. I plan to make the shield 24.5" tall and 20" wide. The
raised silver edging is made from the second piece of foamcore. The Triforce,
eagle, and silver designs are cut out of FunFoam sheets.
Note: This pattern is scaled to me. If you're much larger or smaller than
I am, you will need to adjust the shield size and designs accordingly.
I made a pattern out of newspaper for the shield outline and cut it out
with a snap-off knife. I then painted one side with thinned acrylic blue
paint. Only one problem - painting the front of the curved foamcore made
the shield flatten out. After re-wetting the back with water, I got some
(but not all) of the original curve back. It will have to do.
I traced the shield outline on the second piece of foamcore,
but I didn't cut it out right away. I made the inner shield pattern again
out of newspaper. First I cut out the inside edge, and then I cut the outside
edge and colored the whole thing with silver Fusion spray paint. This
piece kept most of its original curve.
Please note that I don't have a pattern for this
to download. I eyeballed the design myself and cut it from a piece of
newspaper folded in half (so it would be symmetrical).


The two shield pieces were glued together with 7800 adhesive,
clamped down with medium-sized binder clips. I placed cardboard pieces
on either side of the foamcore to keep the clips from "biting"
the shield. I left this to sit overnight. The next morning, the shield
was firmly glued together. However, the clips had left indentations in
the outside edge, and some of the silver paint came off when I removed
the cardboard pieces. I also noticed that the edges of the silver and
blue pieces didn't match up exactly because they had slightly different
curves. I used the snap-off knife to cut off the excess blue that stuck
out under the silver. Then I took the whole shield outside, masked off
the blue section, and repainted the silver. I also painted the edges and
back of the shield silver to match the front. I still had a little overspray,
so I had to retouch the blue sections anyway.

Once the spray was dry, I began work on the back straps.
I took two pieces of nylon strap material and hot-glued it to the back
of the shield - one piece to go around my arm, and the other to be held
in my hand. The two pieces added stability - I didn't want my shield flopping
around. I hot-glued two of the cardboard pieces (used in the gluing above)
on the ends of each strap to hold it down better. I specifically designed
the shield supports to carry the shield with my right arm only. Link is
a lefty, after all (at least, Ocarina of Time Link is a lefty). This means that the hand grip is smaller than the
arm loop.
Then I had to make the designs on the shield. I cut the
Triforce pieces, the eagle shapes, and the silver decorations out of FunFoam
sheets and attached them to the blue shield with hot glue. The "rivets"
along the silver edge were made with metallic silver fabric paint. I then
coated the whole thing with spray polystyrene to keep it waterproof and
to give it a nice even finish.
The Hylian Shield is now complete.
Master Sword
The original Master Sword that Concolor made
wound up not holding up over time. He used upholstery foam with liquid
latex - but unfortunately the latex broke down after a few years. The
paint became sticky and I had to throw it out.
Unfortunately, I don't have a replacement technique for the sword at this time.
Bottled Potions: Link never has an easy time finding
empty bottles, does he? Why should my quest for cosplay accessories be
any easier? I was basically looking for a simple clear bottle with a cork
stopper. I looked at Michaels and Hobby Lobby and didn't find anything
large enough - they only had tiny decorative bottles or things that looked like Love Potion bottles. After a few weeks
of looking at the local thrift stores, I found not one, but two identical
glass bottles with large cork stoppers. Perfect!
Now what kind of potion-like beverage would instantly give
me rejuvenating energy? There's always red or blue Gatorade, or maybe...
Mountain Dew! That marvelous elixir beloved of geeks everywhere, it conveniently
comes in both red and green versions.
Navi: Concolor and I rigged this one up
together.
The base of the body is a cheap dollar-store ping pong ball. We
tried
to get a quantity of ping pong balls from a sporting goods
store, but
these all had company logos on one side. The only generic ones
we found
came from the dollar store. The wing frames were made of braided
floral
wire - three strands of thin silver wire were braided together
to create
a strong, flexible frame for the four fairy wings. The wing
frames are
covered with a thin chiffon fabric that is hot-glued in place. I
decorated
these with blue sparkly glitter glue to mimic the veins in the
wings.
The glow is provided by a blue LED that is wired to a battery
located
in the scabbard belt. The surface of the LED bulb was sanded
slightly with the Dremel to diffuse the light (originally, the light
came straight out as a dot, not a full glow). Navi is attached to the
belt at one point, which
makes her almost look to be floating above my shoulder rather
than firmly
attached to me.
Navi was definitely a two-person project - and I
can't explain the ins and outs of rigging up LED lights, sorry. If you
want a non-glowing Navi, you can always use a painted styrofoam ball for
the body, as it's easy to stick the wires into and still gives you the
right look.
Tips for making your Link costume
unique
Link is instantly recognizable to most con-goers (and even many people in the real world), but that
doesn't mean you have to do his costume as simply as possible! There will
usually be more than one Link at any anime/comic convention (sometimes
there are dozens of Links), and you probably want to stand out from the
rest, right? Depending on which game version of Link you're cosplaying,
he has had a variety of different weapons, items, armour, and boots along
the way. Why not make a prop, weapon, costume, or accessory that you've
never seen before on a cosplayer? Here are some suggestions.
The most famous version of Link (at the moment) is
Ocarina
of Time Adult Link (which is the version featured in this
tutorial). This
specific form of the character has also appeared in Super Smash
Bros.,
Super Smash Bros. Melee, and Soul Caliber 2. The second most
popular form
of Link is his new Twilight Princess style that includes a more
detailed
costume and chainmail underneath his tunic. This version also
appears
in the upcoming Super Smash Bros. Brawl. Some Link
cosplayers carry representations of the Hylian Shield and the
Master Sword. Most Links don't
carry any props at all, and some just carry a generic prop sword
rather than something that looks like the Master Sword. The shield (if
they have one) is usually too small for the person carrying it.
Most Link cosplayers have the standard green
(Kokiri) tunic.
If you want to stand out, the easiest thing is to make a
different colored
tunic (red, blue, black, purple, light purple). Link's costumes
have slight
variations by game. Some versions of Link wear just the green
tunic, others
have a long-sleeved brown, white, or light green shirt under the
tunic,
some wear pants/leggings and others have bare legs (I recommend
wearing
shorts under your tunic if your costume doesn't have pants -
preferably something that matches your tunic color). Some tunic
designs have sleeves and others are sleeveless. Some Links wear
gloves/gauntlets
and others don't. The belt and cap designs vary between games as
well.
If you want to challenge yourself with the clothing aspect of
the costume,
Twilight Princess Link appears to have chainmail between his
tunic and
white shirt.
The best advice I can offer you is to choose one
version of Link and stick with it. You'll have a much better costume if
you decide on one specific incarnation of the character and match it as
closely as possible. Be consistent with your sword and shield designs,
as well as any items you carry. For example, Windwaker Link doesn't
carry the same shield as Ocarina of Time Link. Your costume will be more
polished if you keep to the same theme with every part of your costume.
The average person might not notice or care, but the hardcore fans of
the series will notice the difference, and it will make your finished
costume that much better.
Every game features very different standard shield
designs
(check the official artwork for the 8-bit era games since the
designs
aren't clearly visible in-game), and some games feature extra
shields
like the Mirror and wooden versions. Sometimes there are special
boots like
the Iron Boots and Hover Boots. There is always a variety of
weapons in
any Zelda game. Link has been known to wield boomerangs,
hookshots, clawshots, grappling hooks, bow
and arrows, slingshots, bombs, giant hammers, Bombchus, Deku
Leaves, magical
Staves/Canes, Fire and Ice Rods, and other assorted weaponry.
Although
many games (Link to the Past, Ocarina of Time, Wind Waker,
Twilight Princess) have featured the Master Sword, there are also blades
like the Kokiri Sword, the Biggoron Sword, the Giant's Knife,
and other
unnamed swords from earlier games in the series - not to mention
all the
swords Link can have in Soul Caliber II. Windwaker Link can even
take
his enemies' swords!
And then there are accessories! What about something from
the Happy Mask Shop like the Keaton Mask or the Bunny Hood? Do you dare
make the evil Majora's Mask? You could add a Goron Bracelet or a set of
Silver Gauntlets to your costume to show how strong you are.
f you're cosplaying OoT Link,
why not carry an
Ocarina? I ordered my ocarina about seven years
ago (coincidence?) from
Songbird
Ocarinas, a great company that makes real instruments modeled after
those in Ocarina of Time. It looks like they're styled a little differently
since I got mine, but they still look great. These are made of clay and
have a beautiful tone.
And then there are the items. Want a bottled potion? Check
craft stores and secondhand shops for clear, medium-sized corked bottles,
add water and food coloring (red, green, or blue). You could carry around
a plush chicken and pretend to stab it with your sword. You
could make your own fairy from a large pom-pom and felt for wings. There
are items specific to certain games, like the Wind Waker (baton). You could make
dungeon-exploring items like maps, a compass, silver keys, and a Boss
Key. Remember all the items you had to retrieve in order to progress on
your quests? Spiritual Stones, Pendants, Medallions, even Gold Skulltulas
would work with a Link costume. What about a Piece of Heart, or the Triforce
itself?

If you're really feeling ambitious, you could make one
of
the alternate forms of Link from Majora's Mask like Deku Sprout,
Zora, or Fierce Diety Link. Or team up with three friends and go as the
Four Swords Links -
one each in red, blue, purple, and green. You can keep the
costumes and props simple as long as they are the same (although in
different colors) for each person in your group.
Just because you're doing a common character doesn't mean
your costume has to be boring! With some unique accessories, any Link
costume can stand out from the crowd. Good luck!

 For 2014's Doctor Who Day at the British Emporium in Grapevine, TX, I had a last-minute idea to make a miniature 5th Doctor costume for my one-year-old. This whole thing was put together in about a week from materials I already had around the house. This costume won Best Child Costume at the event!