Showing posts with label Princesses with a Purpose. Show all posts

Monday, November 9, 2015

Belle Ballgown - Shaping the Skirt

This time around, I'm not going to cut into the beautiful gold fabric until I have a complete mockup.  In the past, I'd get a bit of a mockup started and then jump right into real fabric, inevitably making mistakes and having to work with what I'd already cut out. That means that every part of the dress will be figured out first.  It may take longer, but I should have a better final result.

The pattern I selected for Belle's gown has five large pieces in the skirt. According to the film, Belle's dress should have eight sections. This means I have to do some figuring out to turn five (or ten) segments into eight. The plan is to make the exact same skirt but with different seam lines so I can easily create the eight gathered segments.

First I measured the circumference of the bottom of the skirt, and came up with around 185".  I divided that by 8 and rounded the result up to 23-1/4". Starting at the center front of the skirt, I began to mark every 23-1/4" section.  The back two sections are a bit smaller (I probably mis-measured the skirt slightly), but as long as the dress is symmetrical on both sides, I'm ok with that.

Next, I pinned a ribbon from the center waistband edge to the center bottom. The back is easy, because there's already a back seam going from top to bottom. Then I pinned ribbons from the top to bottom along the three in-between points I marked on the right side of the skirt.  The left and right sides are the same, so I only have to do one half of the skirt this way.
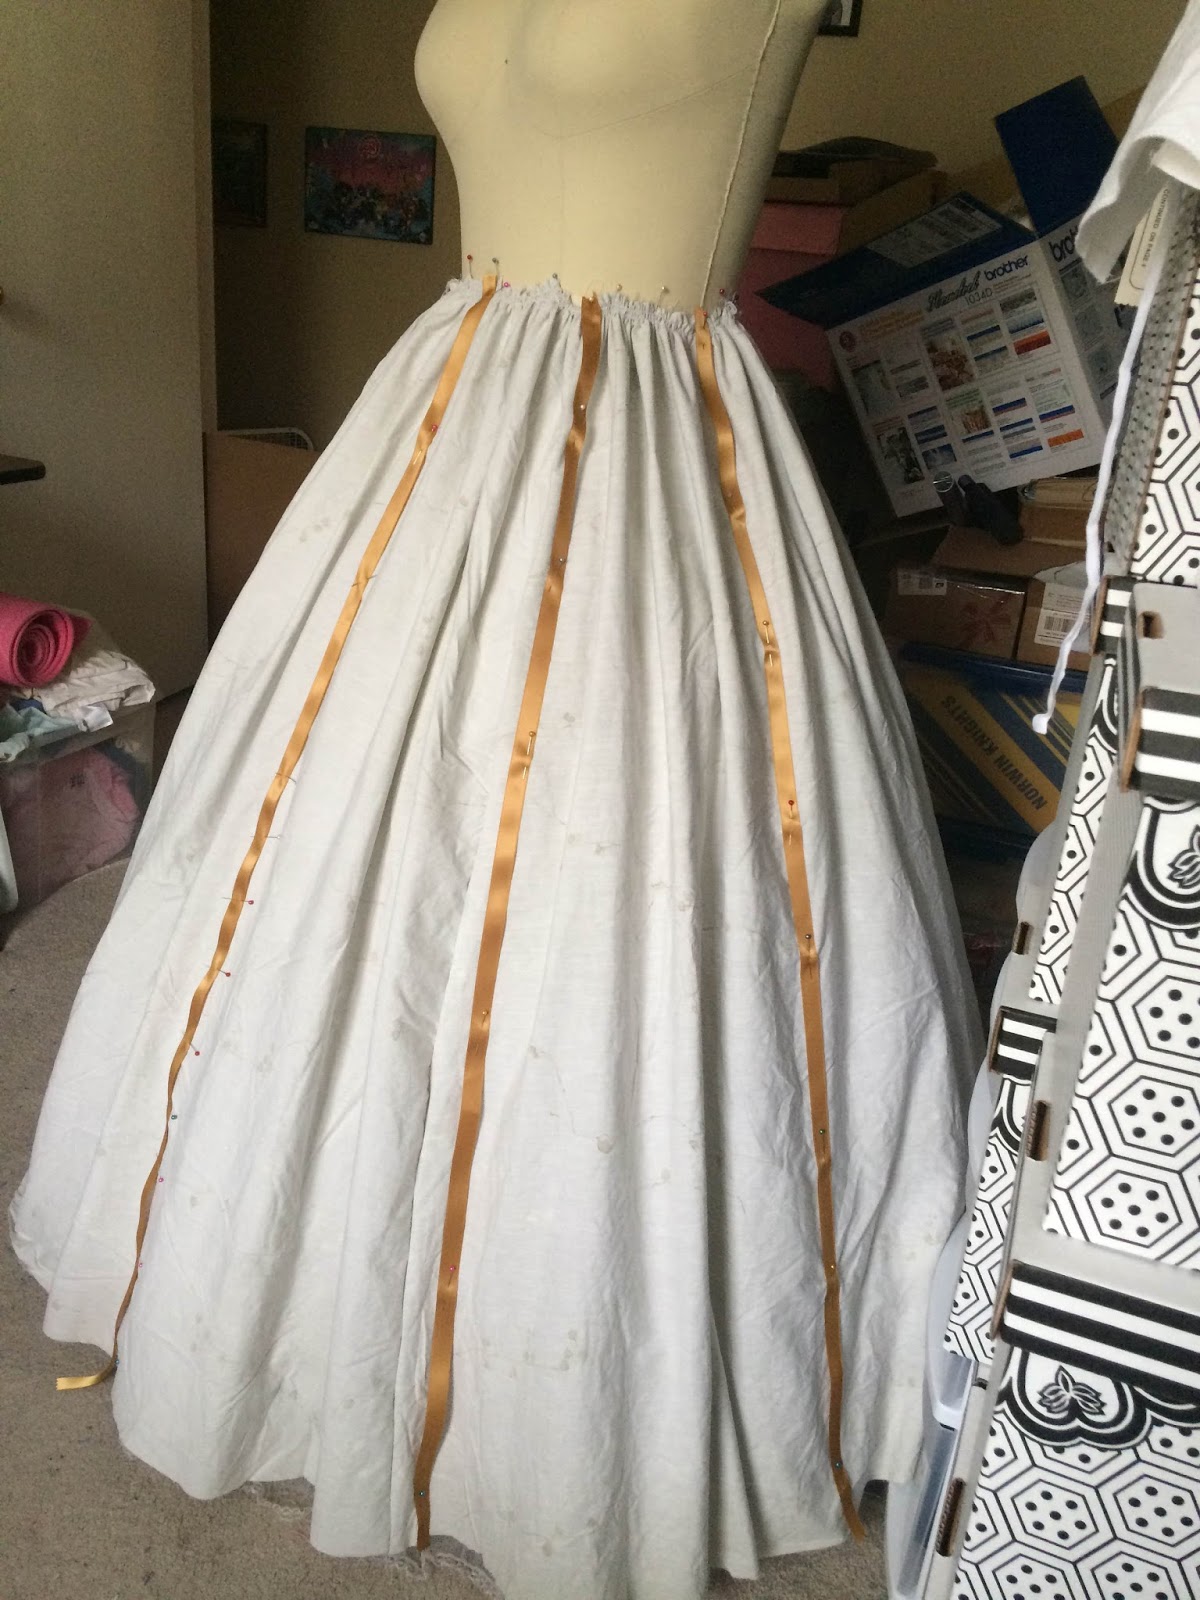
Then I took it off the dressform and ungathered the waistband. Using the ribbons as lines, I traced new pattern pieces from the mockup skirt, and then straightened them out using a yardstick.  This will be a second skirt mockup to test the gathering for the top layer of the skirt. It should be exactly the same as the under skirt, but divided into eight pieces.


I serged all four edges of the overskirt pieces (so they wouldn't shred away while working with them), and sewed them into a new skirt. On this mockup overskirt, I'll determine if the overskirt pieces are long enough once they're gathered, or if I need to add more length to them.
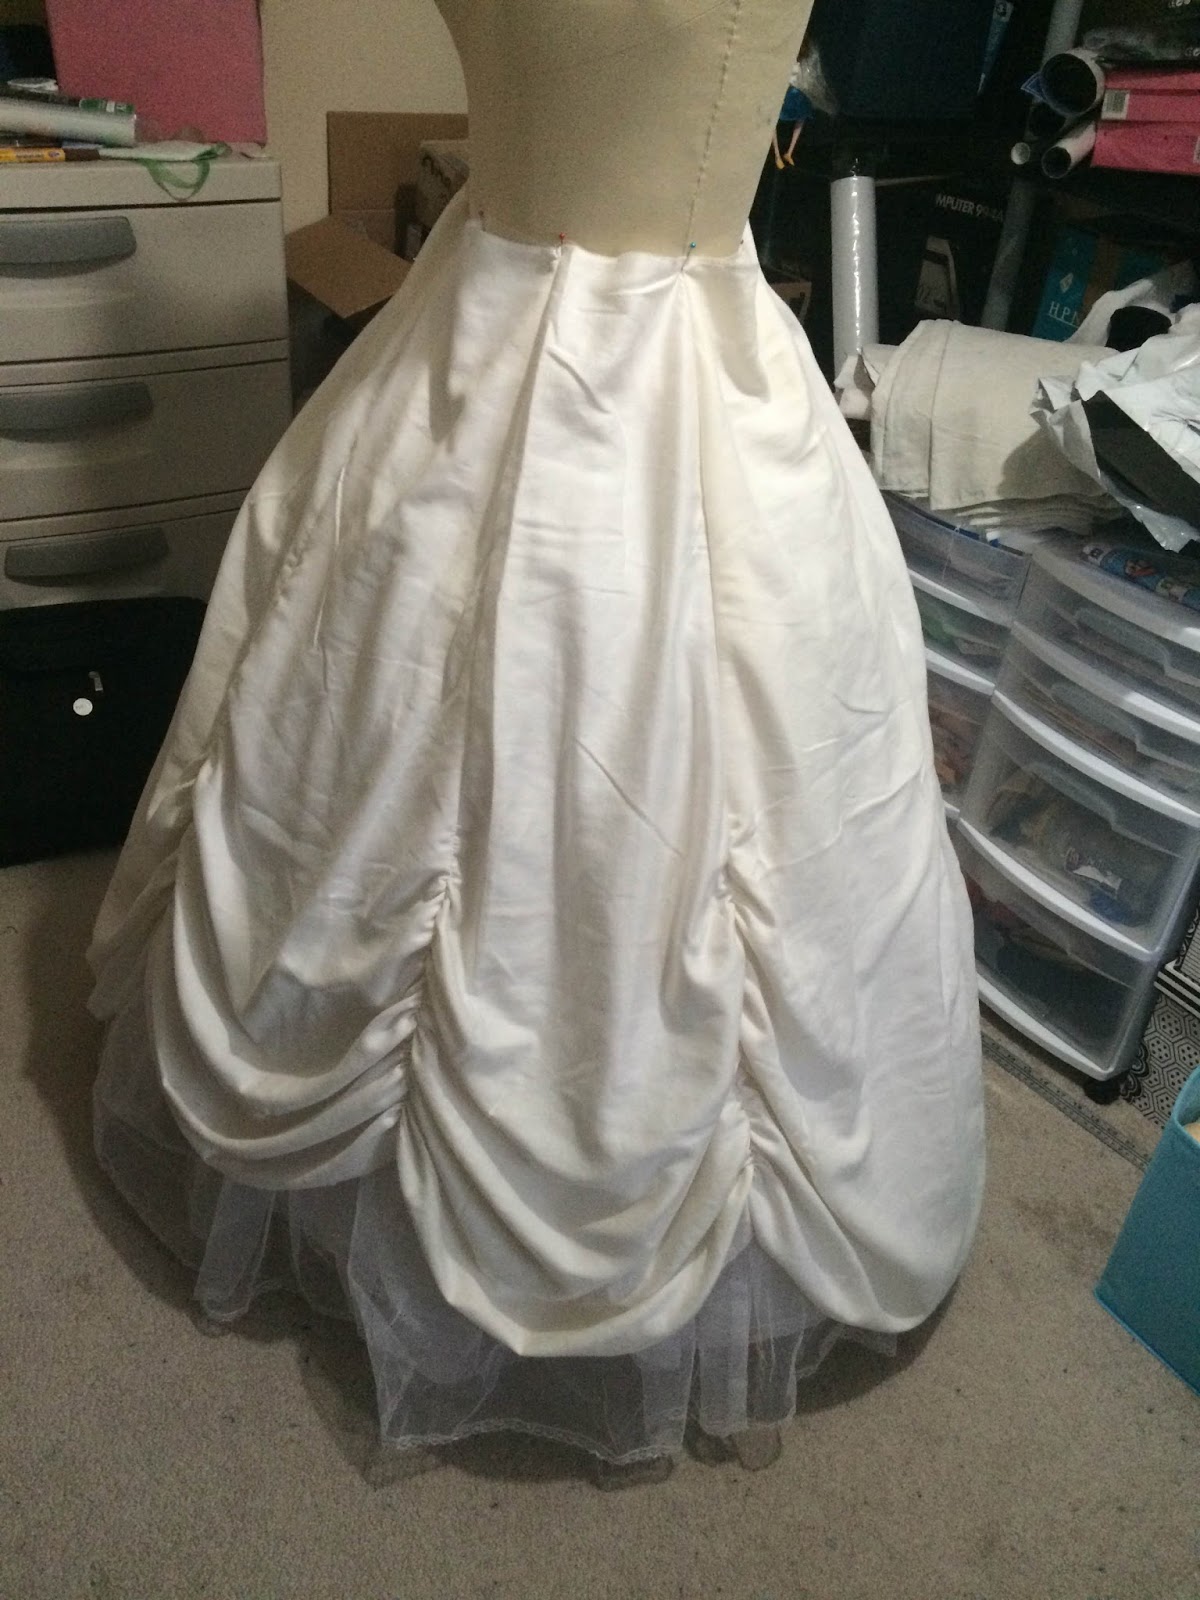
Next I sewed up all 8 pieces into a single skirt.  Then I added gathering stitches (just to test) along two of the seams.  I sewed the gathering stitches inside the seam, which worked a lot better than what I did on my first dress - gathering each individual skirt piece and then sewing them all together. The bottom of the skirt looked great, but the top edge was far too wide. Gathering it (as the pattern called for) made the draping look strange.

I determined that each segment of the skirt should become 7" wide at the top (7" x 8 = 56"), since I'd lose about 1" per side with the seam allowance and gathering to make the draping.  I marked this on each piece, and safety pinned the pieces together at that new waist mark.  Then I turned the dress inside out on the dress form and hoop, and marked a diagonal line with pins from the new waist mark to take up the excess fabric. Essentially, I removed a triangle shape from the top of each seam.  This also had the benefit of giving each piece a consistent width at the top.

Finally, after all of these strange adjustments, I gathered the seam lines on half of the dress, and adjusted the draping. This gives me the look I wanted for the skirt.


Tuesday, November 3, 2015

Belle's hairbow and first photoshoot pics

One of the things I didn't like about my original Belle hairbow was that I put it on a plain black elastic.  It looked "fake" to me because the ribbon didn't appear to wrap around the ponytail - it was just floating there.  When I made my new hairbow, I decided to make a bow and a scrunchie out of the same fabric. 

To make the scrunchie, I used one I already had as a template.  I made a fabric tube, which I sewed along one side then turned inside out.  I cut a piece of narrow elastic (smaller than the tube), attached a large safety pin to one side, and pulled it through the tube.  I used a zigzag stitch to sew the two ends of elastic together, and handsewed the scrunchie closed.

The bow section is a sewn rectangle of fabric with interfacing in the middle, and the center "knot" of the bow wraps around both the bow and the scrunchie, holding the two pieces together. This is glued together, and then handsewn to reinforce the connection.  The interfacing inside the rectangle keeps the bow from becoming floppy.  It might be a little too big, but I'd rather it be a little big than hard to see.


And then... a few preliminary photoshoot pictures!  The farmers' market was rained out, so the princesses had a small photoshoot instead!


Tuesday, October 20, 2015

Belle Gold Ballgown - Materials and Plans

I've made Belle's ballgown before, but since I'm remaking it, I decided to change it up.  I did tons of research on the theme park dresses, and dresses that other people have made, and I decided I would have a few changes to mine since version 1.

I got out my sketchbook and started to take some notes about what I'd like to do differently.


First, I could never hem the ruched sections properly and they dragged on the ground, collecting dirt and debris (from outdoor photoshoots). I wanted to take a note from the theme park dresses and make an underlayer that would have a smooth hem, and put the gathered sections on top of that. Since much of the underskirt would never be seen, I planned to make most of it out of mockup fabric and only do the bottom 12" or so (the visible part) out of satin.

Second, I wanted this dress to be two parts - a bodice and a skirt. The original dress was so heavy being all one piece, and washing the bodice meant the whole thing had to go in the tub. I wanted to be able to wash the pieces separately.

Third, the original skirt didn't have as much volume as I wanted. Yes, it was big, but the gathered sections didn't have the fullness that I had envisioned.  I decided to break with tradition and use (gasp!) a different skirt pattern than my standby, McCalls 4090.  Simplicity put out a pattern for the live action Cinderella movie (Simplicity 1026/S0229) and the lines looked perfect - a bodice with the pointed front that was off the shoulders and a huge skirt, both separate pieces.

 
I couldn't find any fabric I liked locally (sadly, the gold sparkle satin I used before has been discontinued from JoAnns, and Golden D'or didn't have anything that I really liked either). I ordered swatches from Fabric.com and Onlinefabricstore.net and found some nice shades of crepe back satin. Some was far too yellow, but there was a nice range of gold tones.


I also had some fabrics left over from my first gown. I had a few yards of a shimmering gold 2-way stretch fabric, and a bunch of a sheer sparkle fabric from JoAnns.


I liked the two-tone effect of Belle's dress in the film, so I selected a dark gold for the bodice and skirt swags, and a lighter gold for the skirt and shoulders.  The deadline is Dec. 5, but I'll be wearing this in a holiday parade with my red fur-trimmed cloak over it.  That means I only really need to have the skirt finished, and I can fudge the bodice for now. I can also get away with things not being perfect, since the dress will be seen from a distance.

Belle blue dress - getting it wearable

I don't have time to get the costume completely finished the way I want right now, because I also have a deadline to get Belle's ballgown wearable in time for a holiday parade. Instead of spending time to make the blouse from scratch, I decided to modify something I already had in my closet.

Years ago, I made a renfest costume using M4091 (chemise), M4090 (skirt) and M4696 (bodice). In 2014, I purchased another yard of the red fabric and recut the costume into a new renfest dress, wearing it with the blouse from Lady White Mage. The original chemise was just sitting in my closet, ready to be repurposed into something new.

 
First off, the chemise was floor length.  I didn't want to cut it shorter in case I ever needed the extra length, so I hemmed it down to about knee length.  When I wore the original costume, the wrist drawstrings were always coming undone (and it's almost impossible to retie them yourself while you're wearing the costume).  I made cuffs for the sleeves instead using plain white cotton and lightweight interfacing. Once I sewed the cuffs on, I removed the strings (which had helped gather the bottom edges while pinning them in place). The new result is much cleaner.


For the apron, I used a heavier weight white bedsheet (that had a slight tone-on-tone floral pattern). I cut out two of the side skirt triangle shapes out of white and sewed them together.  I made a long waistband from the same fabric (in hindsight, I should have interfaced it also), which I handsewed to the top of the apron triangle shape.  It's not perfect, but it will work.

In the photo at the right, you can see the finished apron.  The chemise was unmodified at this point.  This photo was taken around midnight, so I was pretty exhausted and didn't get the dress smoothed down perfectly before the picture was taken.

For this initial wearing, I'm going to leave the bottom skirt edges unhemmed, although they are serged.

Next: Hairbow and First Photoshoot

Wednesday, October 7, 2015

Belle Blue Dress - Fabric, Bodice, Skirt

The Hunt for Fabric

I assumed I’d be able to walk right into JoAnn Fabrics and buy the same turquoise blue cotton I used last time.  Alas, the only solid cottons they had in blue were dark navy (almost black), an aqua “Elsa” blue, and a light purplish “Ouran Host Club” blue. I thought I’d have better luck at Golden D’or, but they had the same colors of blue and nothing else. I was hesitant to order fabric online for something that was supposed to be a “simple” costume.
I had a lucky find at the local Goodwill. In the pile of bed sheets, I found a lovely blue cotton sheet in a good shade of medium blue. It had a looser weave and didn’t look like a “luxury cotton”, which was perfect for a peasant dress. It’s very thin, so the bodice needed interfacing and the skirt needed a second layer. Of course, I’ll never be able to match this fabric again, so I found myself treating this $2.99 bedsheet like it was rare, expensive fabric.
Drafting the Bodice
I confess – I hate making bodices. I didn’t know the first thing about fitting or making mockups. I would find a pattern that was close to my size (although I usually cut it out too small), and when there were gaps, I’d just put more darts in to kind of smooth them out. This created costumes that looked pretty good, but were made very sloppily. (And let’s not even speak of my very first sewn costume, a classic Princess Peach dress that was fit so badly that the diagonal back seam couldn’t even have a zipper put in – it was fastened with Velcro because I didn’t have any other way of making it work!)
I realized that one of my biggest problems was that I had no starting point aside from my own body, and it’s really hard to figure things out when you can only really see the front and maybe the sides of a garment.  I did some research and purchased a dress form close to my size.  I still need to pad out the bottom (I’m close to a 14 at the top, and maybe a 16 or 18 hips), but it’s a great starting point for figuring out the dreaded bodice. Using some bedsheets left over from my peasant Cinderella dress, I traced the princess seams on the dress form to draft out a basic pattern with 7 pieces (front, 2 side fronts, 2 side backs, 2 backs).  Seeing these pieces helped me figure out why my previous costumes always went diagonal on the back edge – I hadn’t put enough curve into the bottom of the back pieces and I always came up short at the bottom edge.
I took these first pieces and traced them on a new piece of bedsheet fabric, adding seam allowances.
I sewed up this first mockup and tried it on.  I don’t know why it took me so long to realize this, but fitting a bodice is so much easier if you baste in a zipper so you can actually try things on. In previous costumes, I’d enlisted my husband’s help to get the back seam right (which never seemed to be straight up and down). He would put pins along the back edge where the two sides met, and then I’d try to figure out how to put a zipper in a wonky back seam.  With a zipper installed, I immediately could see where I needed some adjustments, which I marked right on the mockup with a Sharpie. Apparently I have a higher natural waist than my dress form, so it’s no wonder I always had so many issues fitting commercial patterns around the waist. After a few adjustments, I began to cut out the blue fabric for the bodice.
As the blue fabric was so thin, I interfaced the fabric and lined it with another layer of the same blue fabric. I left the side seams open so I could make some additional fitting adjustments. The bodice has much more structure and smoothness with the interfacing.
Skirt
For the skirt, I went back to my old standby of McCalls 4090, but reduced the fullness by eliminating two of the side pieces and cutting the remaining two symmetrically.  I also made the skirt about a foot shorter than the pattern calls for. The blue fabric was a bit see-through, so I made a second skirt out of a heavier white cotton bedsheet.  I also got to try out my new serger for the long skirt seams and along the top and bottom edges of the skirt to prevent fraying. I gathered both skirts slightly and sewed them to the bottom of the bodice. 

At this point, I need to attach the shoulders, do some fitting on the bodice sides, and hem both skirts. Then I can move on to the apron and blouse.


Tuesday, October 6, 2015

Belle Blue Village Dress – Costume Remake, 9 Years Later


First photoshoot with Belle - El Paso, 2006
Introduction
It’s easy to think back fondly on a costume you made years ago, wore many times, and have since parted with. You don’t remember the issues you had sewing the darn thing as much as you remember the fun you had wearing it.
Belle’s blue village dress is one such costume for me. This was the second costume I ever sewed, created in June 2006 and debuted at A-Kon 2007. I wore her for a few outdoor photoshoots and for many “casual cosplay” events with TMCC (a local costume club that is no longer active). Belle was a great costume for cosplay ice skating and restaurant trips, even though I rarely wore her to conventions. There were a few things I know I could have made better (the collar on the blouse, for example) but I never had the presence of mind to remake the dress. 
After having a child, Belle was one of the many costumes in my closet that no longer fit. A visitor to my Facebook page expressed interest and purchased the costume.  I assumed I was done cosplaying Belle for a while, since she never seemed to be a good fit for conventions and I rarely do cosplay outings anymore.
Cosplay on Ice with TMCC
But then I discovered Princesses with a Purpose and auditioned for Cinderella and Belle – and got the roles. I already had my Cinderella dress ready to go, created expressly for volunteer work. But none of my Belle costumes fit anymore. The group had a Belle ballgown, but I wanted to make my own (especially since I’ve never been a fan of putting Belle in yellow; I prefer her dress in gold).
I decided to start with Belle’s blue village dress, as I had many years earlier, before moving on to the ballgown. I was determined to make this dress “right” this time. Armed with a few new tools – a professional dressform and a serger – but much less free time, I started my construction of this provincial dress.

Photo courtesy of SkyPirate
Lessons Learned from Last Time
Right off the bat, there are a few things that I knew were a little off on my original Belle. 
First off, the collar on the white blouse. I had no idea how to make that, so I made a loose chemise and fudged the collar entirely.  Looking back at old progress photos, I gathered the neckline and sewed a strip of cotton fabric around the opening, putting in a few hand stitches to make it look right. It looked great when I first made it, but it didn’t hold up as well after being washed. I could never iron it and it became a wrinkly thing that I struggled to get over my head (as I had made the opening just a bit too small).
After doing some research, I learned that the collar on Belle’s blouse is called a shawl collar. Knowing the name of the demon is necessary to control it – or at least to do the research and learn how to sew it.  I looked closely at photos from the Disney parks and noticed that the white blouse looks like it buttons up the front, which would solve the problem of pulling it over the head.
Second, the shoulder straps. I didn’t know that “straight” shoulder straps needed to be made from curved pieces.  These were literally just strips of fabric. They never sat properly and often fell off my shoulders when I was wearing the dress.
Looking back at photos, I can’t believe how wrinkled and ill-fitted the bodice was. I knew very little about tailoring and fitting, and I sort of jimmy-rigged the bodice from another pattern. It never fit perfectly, but the apron usually cinched up the waist to fit well enough.
Speaking of the apron, I cut it slightly wrong (crooked at the bottom) and figured I’d fix the length when I hemmed it.  Except that I made it out of thin white cotton, and you could see the wonky diagonal hemline through the fabric.
Finally, putting wide elastic in the sleeve cuffs seemed like a good idea at the time, but my arms usually started to hurt after a few hours because the sleeve cuffs were a bit too tight.

These were all issues that I planned to fix in the new iteration of the dress. Considering how many times I've worn Cinderella, I have a feeling that Belle is also going to get a lot of wear. I need to make this dress sturdy and durable (not to mention washable!)
Belle at A-Kon 2007 with the Divine Rose Keyblade from Kingdom Hearts
 
More posts on this costume: